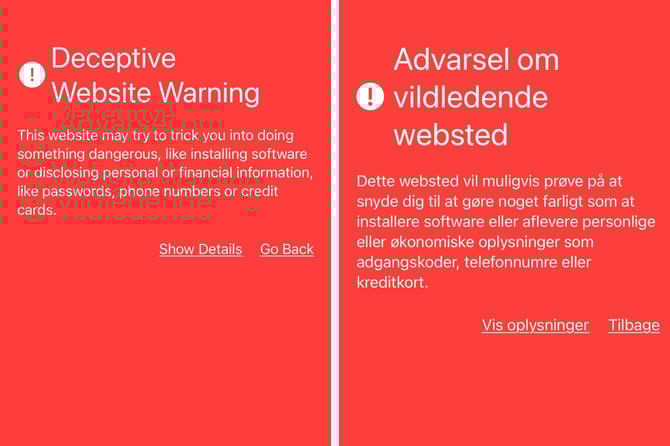
The domains used in Moxso phishing simulations may occasionally be falsely flagged by Google Safe Browsing as malicious, deceptive, or involved in social engineering. In such cases, users might see warning banners when clicking on simulation links or QR codes — potentially hindering the intended flow. By implementing a Safe Browsing allowlist that includes the simulation domains, you ensure that users can access simulation content without interruption.
Prerequisites (where applicable)
- Administrative access to Entra ID Portal (for Windows 11) or Administrative access to Intune Portal (for macOS).
- Administrative access to the Google Admin Console (for enterprise settings) or the Chrome browser settings (for individual users).
- A list of the domains or URLs you want to allow.
- One or more XML or CSV templates for uploading the domains to each respective service.
About the simulation domains
Simulations mainly rely on the following kinds of domains:
- Sender domains: used to send simulated emails.
- Landing page domains: used for spearphishing (credential harvesting) simulations.
Allowlisting via Entra ID (Windows 11 / Intune)
- Open the Entra ID Portal → go to Devices > Windows (or navigate via the Intune Windows portal).
- Click Create → New Policy.
- Select Platform: Windows 10 and later and Profile type: Settings catalog.
- Provide a name for the profile (e.g., Chrome Safe Browsing Allowlist for Moxso simulation domains) and click Next.
- Under Configuration settings, click Add settings.
- In the Settings picker, search for Safe Browsing. Choose Google Chrome Safe Browsing settings.
- Enable the option Configure the list of domains on which Safe Browsing will not trigger warnings.
- Import the list of simulation domains (via CSV or XML) and click Next.
- Complete Scope tags and Assignments, then review and create the profile.
Allowlisting via Intune (macOS)
- Open the Intune Portal → go to Devices > Mac.
- Click Create → New Policy.
- Select Template: Custom.
- Provide a name for the profile (e.g., Chrome Safe Browsing Allowlist for Moxso simulation domains) and upload a ChromeSafeBrowsingAllowlist.xml populated with the provided domains.
- Assign to the appropriate group, then review and create the profile.
Allowlisting via Google Enterprise Policy (for managed Chrome environments)
- Access the Google Admin Console (admin.google.com) with rights to manage Chrome policies.
- Navigate to Device Management → Chrome → Settings / Policies.
- Locate the Safe Browsing policy section (could be named Safe Browsing Allowlist, URL Exemptions, or Whitelist, depending on your console version).
- Add the Moxso simulation domains into the allowlist.
- Save, propagate the policy (may take ~1 hour), and confirm end-users no longer see Safe Browsing warnings for those domains.
Local/Machine-level Browser Settings (non-managed devices)
- Open Chrome → go to Settings → Privacy and security → Security.
- If Safe Browsing is set to “Enhanced” or “Standard,” note that Chrome does not provide a user-facing per-domain allowlist. For local or unmanaged devices, full allowlisting usually requires enterprise/browser policy configuration.
- If enterprise policy isn’t practical, you may adjust Safe Browsing level or other settings — though this is not recommended for large-scale, managed deployments.
Verification
After applying the allowlist:
- Use a test account or device.
- Access one of the allowlisted simulation URLs.
- Confirm that Google Safe Browsing does not display warning banners and that the simulation flow (click-through, landing page, credentials page) works correctly.
Allowlisted domains
You can find the list of simulation domains in your Moxso admin portal under Settings > Simulations > Simulation deliverability > Download simulation domains.