
SAML lets your admins and employees log into Moxso using their Okta credentials. No separate Moxso password required.
SCIM keeps your Moxso users and groups in sync with Okta automatically. When someone joins, changes department, or leaves your organization, Okta pushes those changes to Moxso without any manual work.
Enabling SCIM makes user and group management in Moxso read-only. Once SCIM is active, you can no longer add or edit users manually, and you can no longer manage groups directly in Moxso. All user and group management must happen in Okta. Make sure your Okta directory is accurate before you enable SCIM.
How it works
The setup has two parts that build on each other. SAML handles authentication (how admins and employees log in) and SCIM handles provisioning (how users and groups stay up to date). Both are configured within the same Okta app.
Before you begin
Check the following before starting:
- Your organization's domains are verified in Moxso. Go to Settings and check the Verified domains section. Domains must show a Verified status. Moxso only syncs users whose email addresses match a verified domain.
- You've decided which Okta users or groups to sync. We recommend starting with a small test group to verify the setup before rolling it out to everyone.
Part 1: Set up SAML
Step 1: Start the SAML provider setup in Moxso
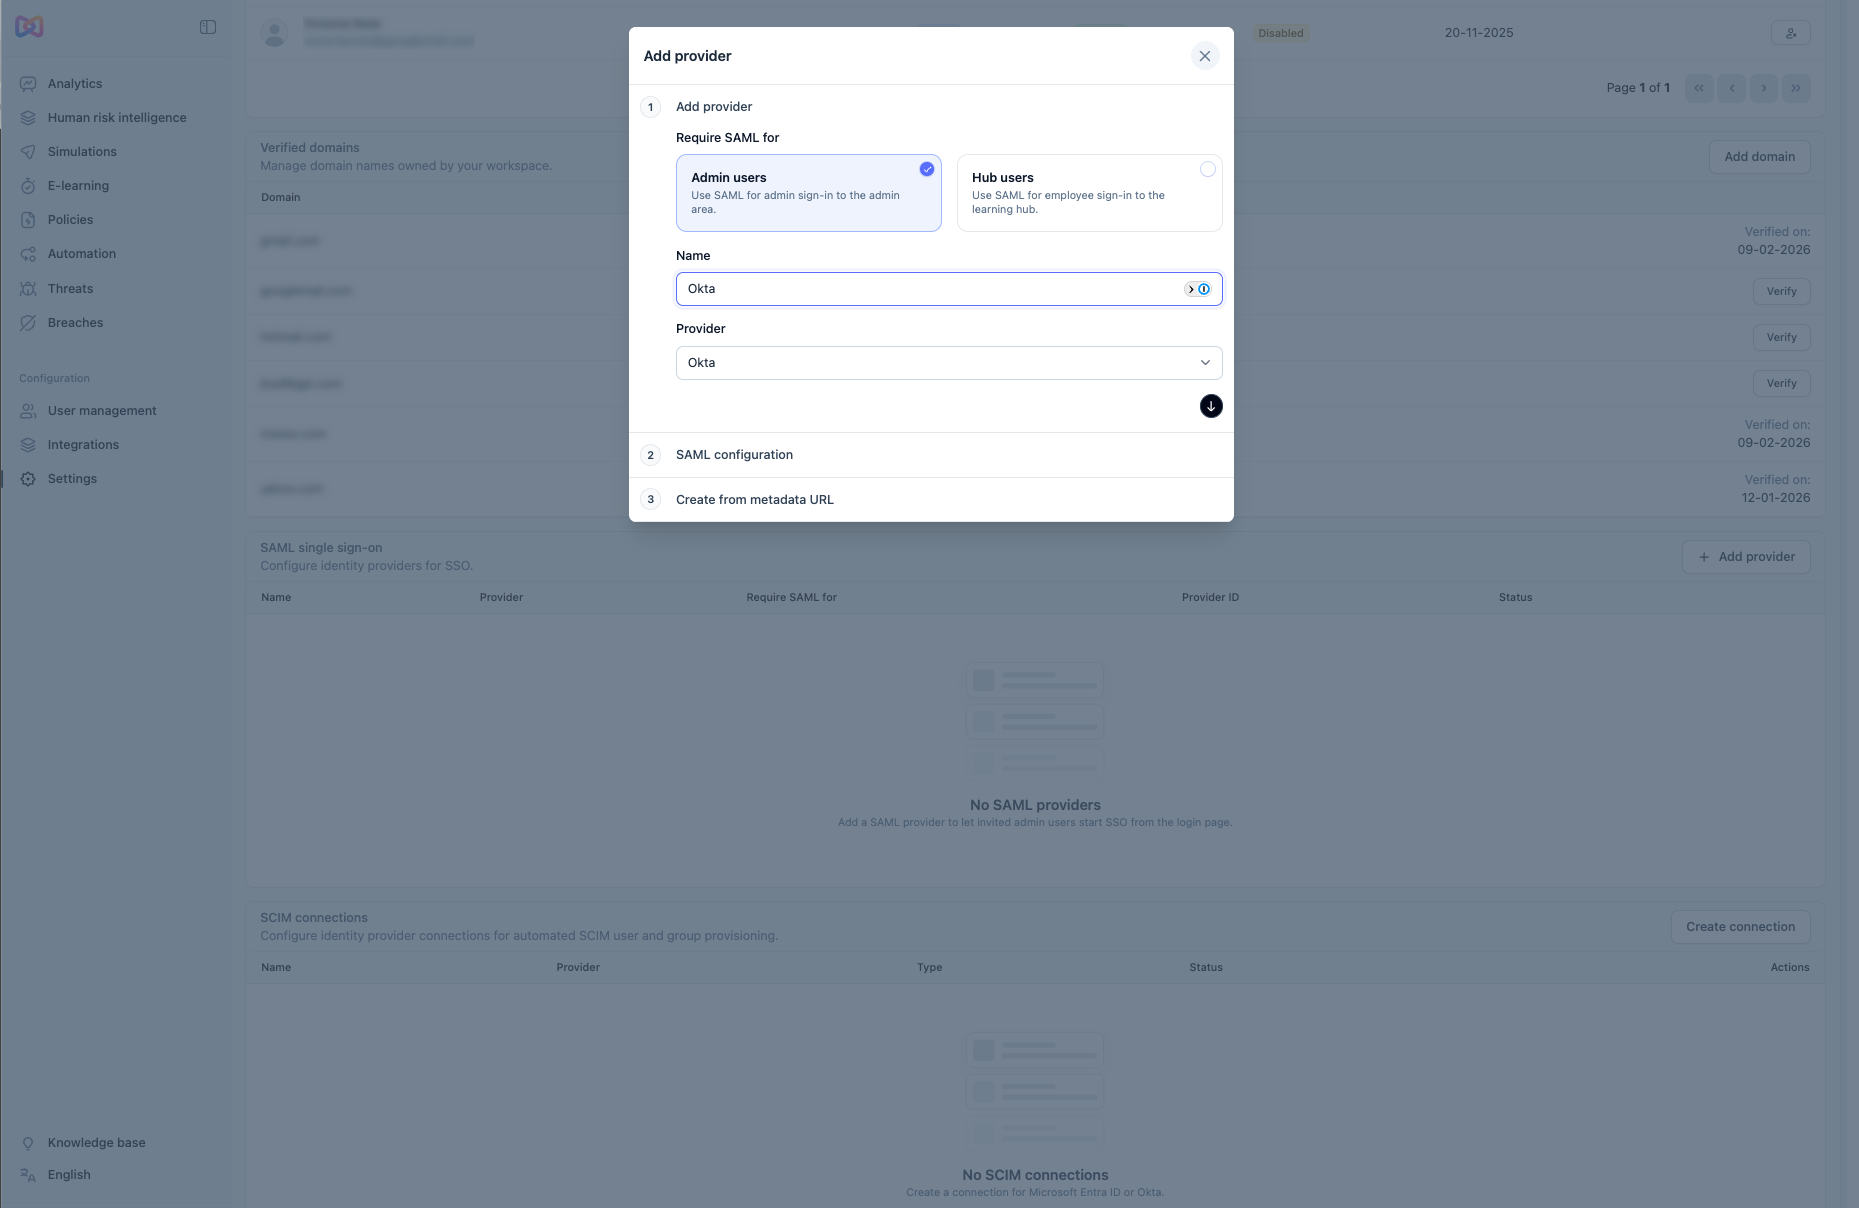
- In Moxso, go to Settings > SAML single sign-on.
- Click Add provider.
- Under Require SAML for, select Admin users.
- Enter a Name for the provider, for example
Okta. - Set Provider to Okta.
- Scroll down to SAML configuration.
Copy the following values. You'll need them in the next step:
|
Value |
Where it goes in Okta |
|
ACS URL |
Single sign-on URL |
|
Metadata URL |
Audience URI (SP Entity ID) |
Leave the form open. You'll return to it shortly.
Step 2: Create the Moxso app in Okta
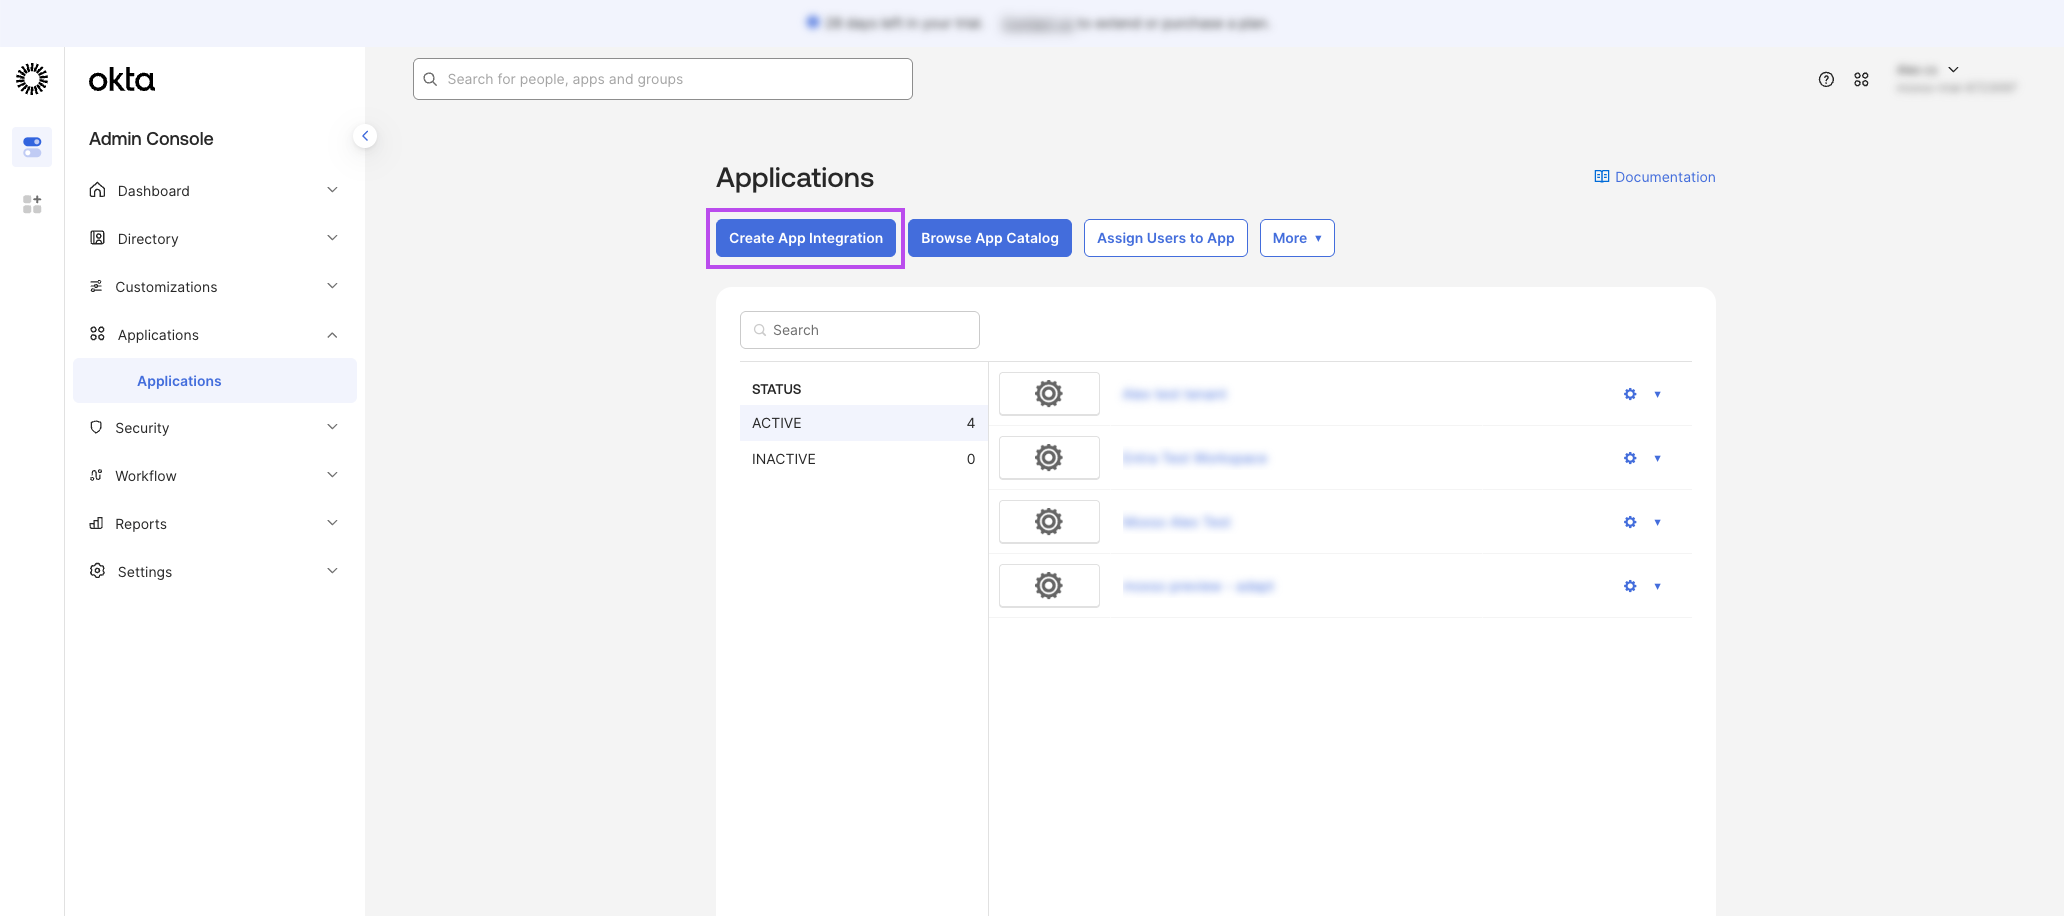
- In Okta, go to Applications > Applications.
- Click Create App Integration.
- Select SAML 2.0 and click Next.
- Enter an App name, for example Moxso. Click Next.
- On the Configure SAML screen, enter the following:
- Single sign-on URL: paste the ACS URL from Moxso.
- Audience URI (SP Entity ID): paste the Metadata URL from Moxso.
- Leave Use this for Recipient URL and Destination URL checked.
- Leave Name ID format as Unspecified.
- Click Next, then Finish.
Okta creates the app and opens it on the General tab.
Step 3: Enable SCIM provisioning in the Okta app
While you're on the General tab:
- Click Edit in the App Settings section.
- Under Provisioning, select SCIM.
- Click Save.
This unlocks the Provisioning tab, which you'll configure in Part 2.
Step 4: Get your setup values from Okta
Now Okta needs to give Moxso the values to complete the SAML connection.
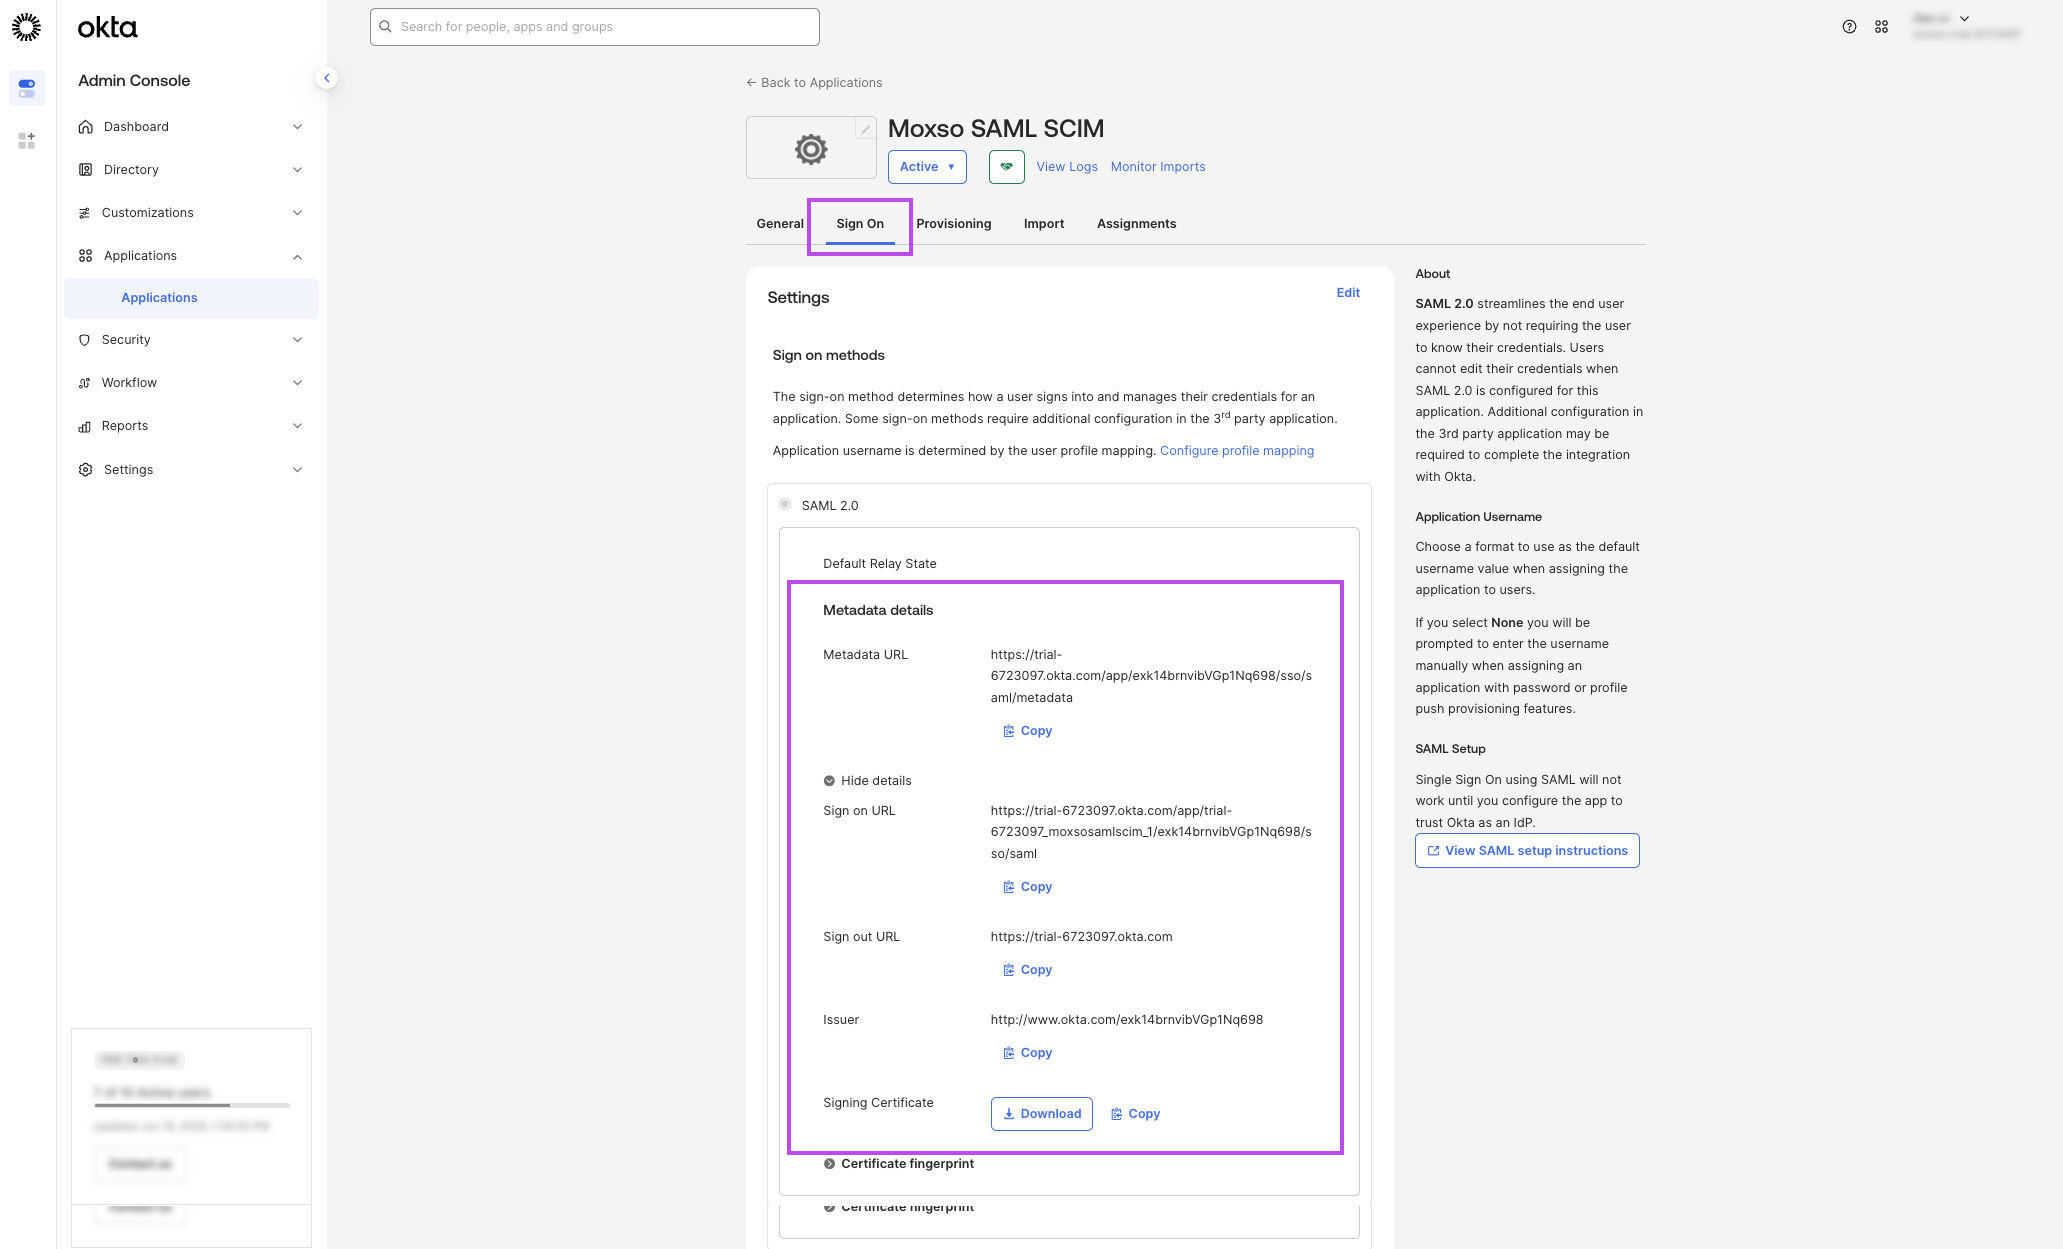
- In the Moxso app in Okta, go to the Sign On tab.
- Under Metadata details, copy the Metadata URL.
Using the metadata URL is the recommended method. Moxso fetches the IdP entity ID, login URL, and certificate automatically, which reduces the chance of configuration errors.
If you prefer to complete the setup manually, copy the following values:
|
Value |
Where it goes in Moxso |
|
Issuer |
IdP entity ID |
|
Sign on URL |
IdP login URL |
|
Sign out URL |
IdP logout URL |
|
Signing Certificate |
IdP X.509 certificate (download or copy) |
Step 5: Complete the SAML setup in Moxso
- Go back to the Add provider form you opened in step 1.
- Scroll down to Create from metadata URL.
- Paste the Metadata URL from Okta into the App federation metadata URL field.
- Click Fetch metadata.
- Toggle Enable provider on.
- Click Save provider.
We recommend keeping SAML Single Logout disabled in Okta (it's off by default). If enabled, signing out of Moxso signs the admin out of all other applications they're logged into through Okta. This is rarely the intended behavior. Leave it disabled unless you have a specific reason to turn it on.
Step 6: Test the SAML login
Before moving to SCIM, verify the SAML connection works.
- Open a private browser window.
- Go to your Moxso admin login page.
- Select the Okta provider you just created.
- Log in with an Okta admin account.
If the login succeeds, SAML is working. If it fails, go back and check that the values in Moxso and Okta match exactly.
To set up SSO for employees (Hub users in Moxso), repeat steps 1 to 6 and select Hub users instead of Admin users in step 1.
Part 2: Set up SCIM
Step 7: Create a SCIM connection in Moxso
- In Moxso, go to Settings > SCIM connections.
- Click Create connection.
- Enter a Connection name, for example Okta.
- Set Provider to Okta.
- Turn Enabled on.
- Click Save connection.
The Provisioning endpoint section now shows your Tenant URL: https://api.moxso.com/scim/v2
Keep this page open.
Step 8: Generate a SCIM token
Okta needs a token to authenticate with Moxso.
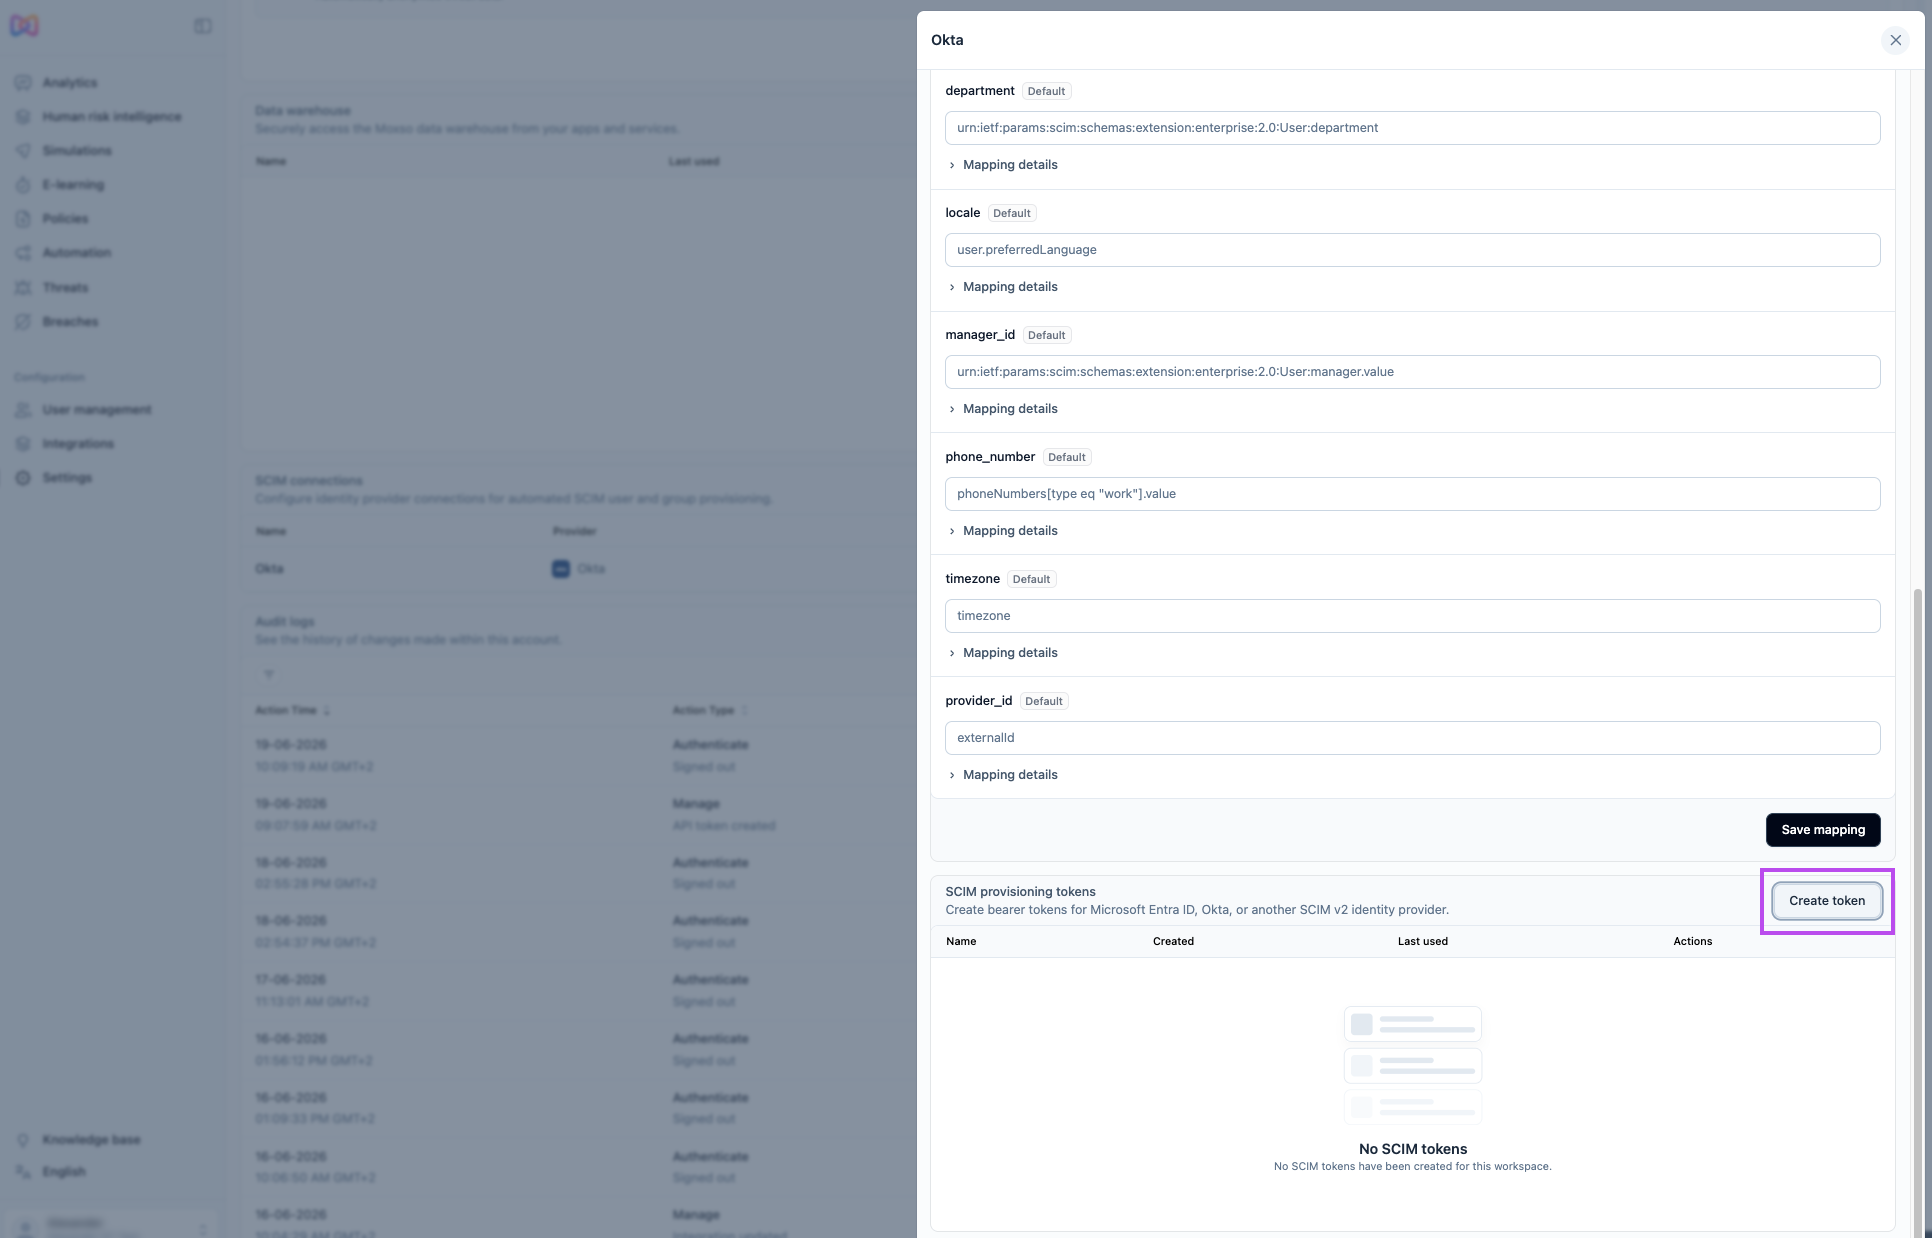
- Scroll down to the SCIM provisioning tokens section on the same page.
- Click Create token.
- Enter a token name, for example Okta provisioning.
- Click Create token.
A SCIM token created dialog appears with your secret token.
Copy this token now. It's only shown once. If you close this dialog without copying the token, you'll need to delete it and create a new one.
Copy the token and store it somewhere you can access in the next step.
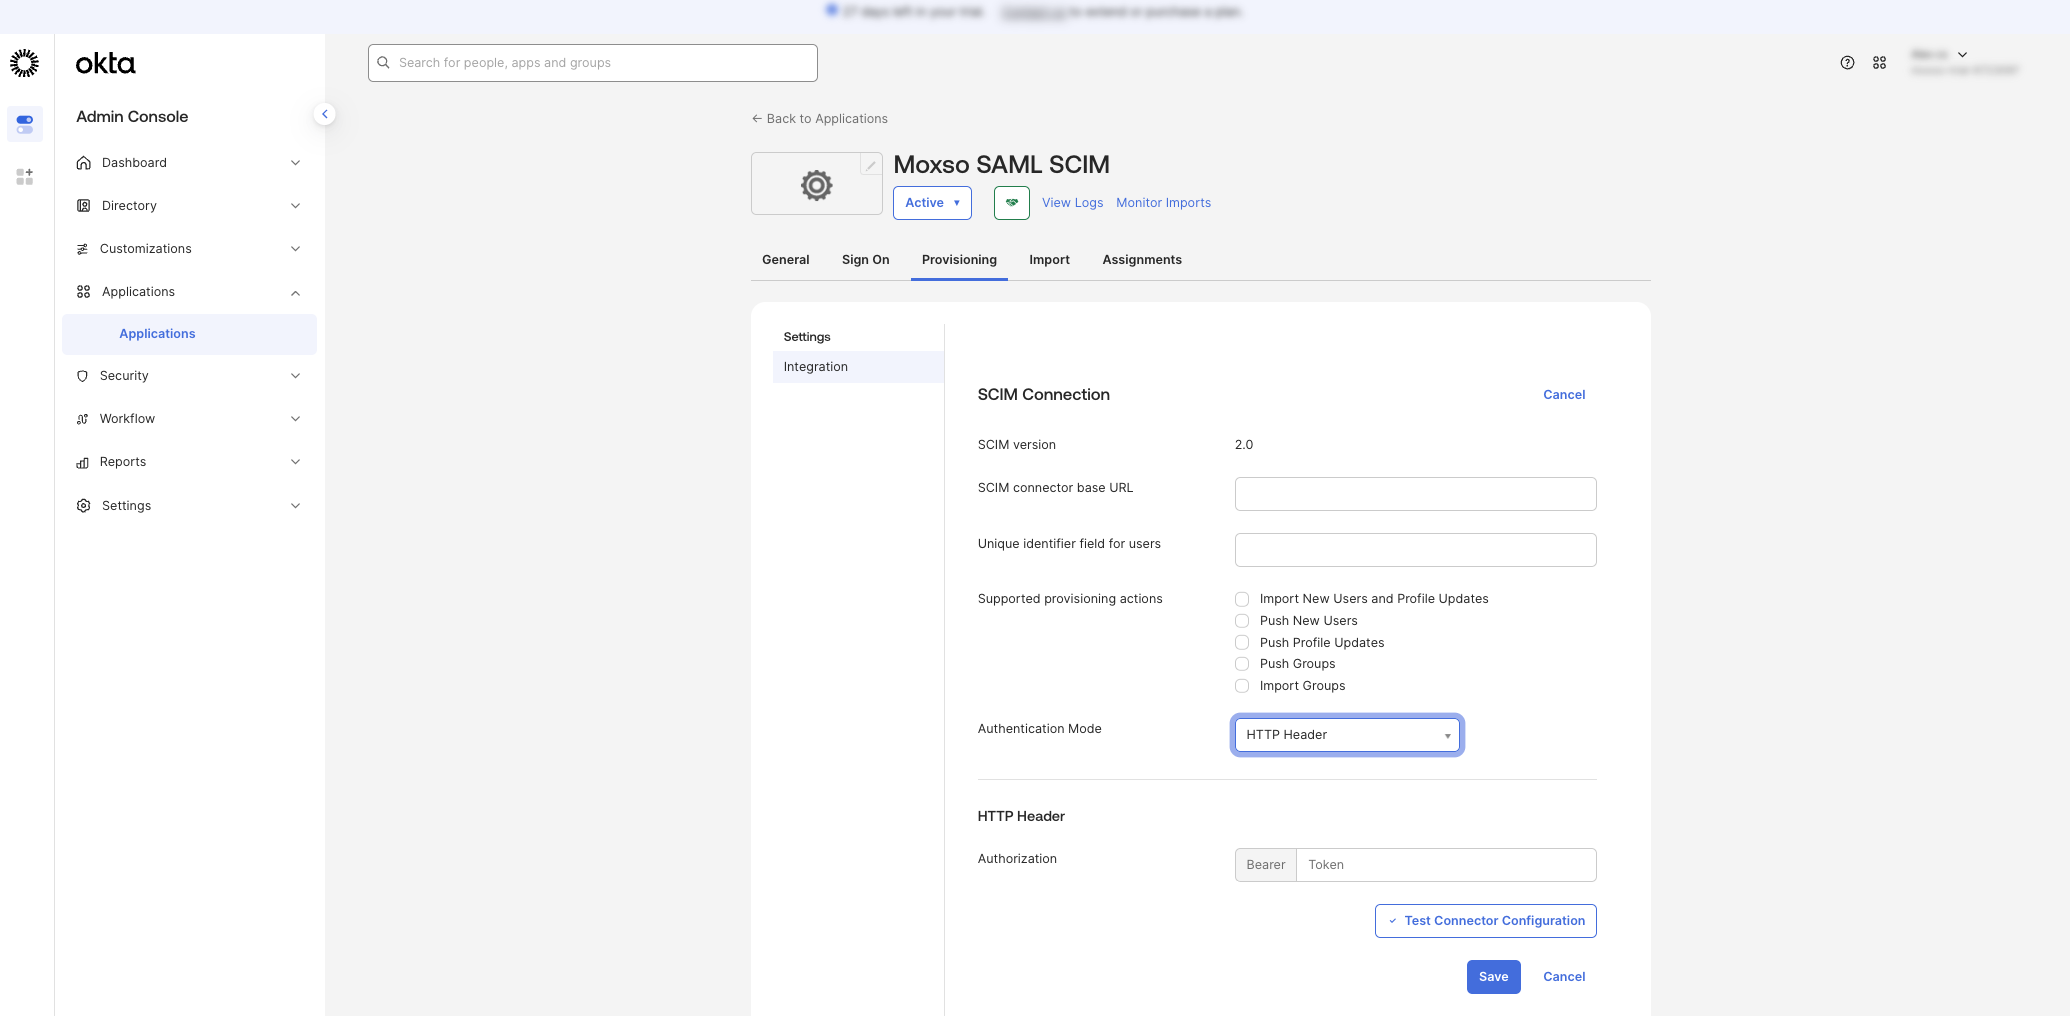
Step 9: Configure SCIM in Okta
- In the Moxso app in Okta, go to the Provisioning tab.
- Click Integration in the left pane > Edit.
- Fill in the SCIM Connection form with the following values:
- SCIM connector base URL: https://api.moxso.com/scim/v2
- Unique identifier field for users: email
- Supported provisioning actions: select Import New Users and Profile Updates, Push New Users, Push Profile Updates, and Push Groups.
- Authentication Mode: select HTTP Header.
- In the Authorization field that appears, enter your token in this format: Bearer <your-token>, replacing <your-token> with the token you copied in step 8.
- Click Save.
Step 10: Enable provisioning features
- In the Provisioning tab, select To App in the left panel.
- Click Edit on the right side of the Provisioning to App section.
- Enable the following features:
Feature
What it does
Create users
Creates a Moxso account when you assign a user to the app in Okta.
Update user attributes
Syncs attribute changes from Okta to Moxso automatically.
Deactivate users
Deactivates the Moxso account when a user is unassigned or deactivated in Okta.
- Leave Sync Password disabled.
- Click Save.
We recommend enabling all three features. If you skip Deactivate users, former employees will keep their Moxso access after leaving your organization.
Step 11: Check attribute mappings
The attribute mapping table below shows the default mappings. You don't need to change these unless your Okta profile uses non-standard attribute names.
|
Moxso field |
Okta attribute |
|
First name |
name.givenName |
|
Last name |
name.familyName |
|
|
emails[type eq "work"].value |
|
Department |
urn:ietf:params:scim:schemas:extension:enterprise:2.0:User:department |
|
Locale |
user.preferredLanguage |
|
Manager |
urn:ietf:params:scim:schemas:extension:enterprise:2.0:User:manager |
|
Phone number |
phoneNumbers[type eq "work"].value |
|
Timezone |
timezone |
To view or change mappings, go to Provisioning > To App > Attribute Mappings in Okta.
Moxso only processes attributes it actively supports. Additional attributes sent from Okta are ignored. If you're unsure which attributes to keep, click Reset to defaults in the Moxso SCIM connection settings.
Step 12: Assign users or groups in Okta
- In the Moxso app in Okta, go to the Assignments tab.
- Click Assign and select Assign to people or Assign to groups.
- Select the users or groups you want to sync and click Assign for each.
- Click Done.
For your first sync, assign a small test group. Two or three users is enough. Verify they appear correctly in Moxso before assigning everyone.
Step 13: Trigger your first sync
- In the Moxso app in Okta, go to the Provisioning tab.
- Click Force Sync to start the first sync immediately.
The sync runs in the background. Once complete, go to User management in Moxso to confirm your test users appear with the correct attributes.
Sync schedule
After the first sync, Okta pushes changes to Moxso automatically. The frequency depends on your Okta plan, typically every 40 minutes. You can trigger a manual sync at any time using Force Sync in the Okta app.
Common questions
What happens to existing Moxso users when I first enable SCIM?
Users whose email addresses match users in Okta are linked automatically. Users who exist in Moxso but not in Okta remain as-is until you deactivate or remove them manually. Once SCIM is enabled you'll need to manage that from Okta.
Can I use SAML without SCIM?
Yes. SAML for admin login and SCIM for provisioning are independent. You can set up SAML alone if you want single sign-on without automated user sync.
What happens if I disable the SCIM connection?
Disabling the SCIM connection restores manual user and group management in Moxso. Existing users are not removed. Future changes in Okta will no longer sync until you re-enable it.
A user changed their department in Okta. Does that update in Moxso?
Yes, if Update user attributes is enabled in Okta. The change syncs on the next automatic or manual sync.
Can I prevent specific users from being managed by SCIM?
Not at the individual user level. SCIM manages all users assigned to the Moxso app in Okta. To exclude a user, remove them from the app assignment in Okta.